Wednesday, August 12, 2015

Custom Kitchen Island

Several weeks ago, we posted one of our most popular makeovers to date, a rolling kitchen island with and extendable top (see it here). We received a request from one of our customers to be on the lookout for another one. We found this microwave stand and immediately thought it would make a great rolling island for our customer... See it's transformation below!


Here is the microwave stand in it's original form... Interesting choice in knobs!


Hank completely disassembled it, sanded down each piece, and put it back together stronger than it was before! He removed the top because it was laminate, and our customer wanted a dark stained top. Real wood is the best way to go if you want stain. Here he is attaching custom made support for the extendable top.


Here's the island with it's brand new top! There are 3 hinges on the back to hold up the extension piece. The support folds out to extend the top, or folds in to release it. Hank added rolling feet to the legs. He decided to trim down the legs so that the height would remain the same with the rolling feet added to the bottom.


We stained the top on both sides with Minwax Polyshades Stain and Polyurethane - Mission Oak, Satin finish (3 coats).


Here is the finished product! It took 3 coats of black paint, and 3 coats of polyacrylic to seal it. 

View of the back.


Inside is painted and sealed as well!

View of the drawer and the gorgeous stain on top.

Our client was very happy with the end result. I'm a little jealous because I wanted to keep it;) That happens a lot! Now we're on to the next project: a commissioned table and chairs makeover:) Stay tuned!


Friday, August 7, 2015

Refinishing Kitchen Cabinets

Hey everyone! It's been a minute since I've blogged, but the good news is it's because we have been very busy! Today, Hank and I just finished up refinishing kitchen cabinets for one of our customers here in Friendswood. Her original finish was a very light sand color, and she wanted to go with a darker tone that would coordinate better with her floors and living area. See pictures below for the transformation!


The first step is to remove all of the cabinet doors/drawers, and either empty your cabinets or you can block them off with trash bags and tape.


Here are all of the cabinet doors and drawers sitting pretty in our garage.


We removed all of the hardware from the doors and drawers. It is so important to stay organized during this process. In the past, I've gone so far as to separate out the hardware for each door/drawer.


Our customer chose Oak Creek, Behr Brand - Home Collections for their cabinets.


 We went with the Behr Premium Ultra Paint and Primer, Interior Semi-Gloss.


Now this is the fun part. Sanding. It is so important to sand off the original finish, otherwise the paint will not stick and you will have paint peeling off in no time! When done, wipe down each door with a damp rag and dry completely before applying paint.


Here is the base of the cabinets with 3 coats of paint and 3 coats of polyacrylic to give it plenty of protection from wear and tear. As you can see, I taped off the edges (floors, walls, etc) with painter's tape to keep the lines as clean as possible.


Due to limited space in the garage, we set up a pavilion in the back yard and started painting the doors.


My son even got in on the action!


Here is a close up of one of the doors. Each side required 3 coats of paint and 3 coats of polyacrylic.


Be sure to let the last coat of polyacrylic dry overnight so that the finish does not get damaged during transport!


Here is the kitchen after we brought all of the doors back in to re-install...


After hanging the doors, installing the knobs and drawer pulls... Here is the finished product! Our customer was extremely happy with the end result, which makes us extremely happy!

 Refinishing cabinets takes a lot of hard work, patience, and perseverance. The end result is worth it!


Monday, July 13, 2015

Dresser to TV Console Conversion


A few weeks ago, we got a request from one of our customers to turn this dresser into a TV console. See it's transformation below!


Our customer didn't have a dresser on hand, so Hank and I went hunting and found this piece. It's a slightly different design than the one we did previously (see it here), which is exciting because we LOVE a new challenge!


First, we removed the top 3 drawers and center cabinet door. We also removed the top so we could have access to the inside. Hank then built boxes to fit the inside of each opening. These boxes can hold a cable box, gaming systems, you name it!


After the boxes were installed, we gave it a finished look by trimming them out with a small moulding. We also decided to add an updated baseboard to the bottom for a more modern look. Hank then reattached the top. Ready for sanding and painting!


Here it is after sanding...


After priming this piece with a coat of KILZ 2 (for latex paint), I added a base coat of brown.


The customer requested a rustic, red-orange look to bring a pop of color to her room. I decided to do a base coat of brown so that when it is distressed, the brown will be exposed.


Here it is with a couple of coats of the red-orange... Time to tone it down!


After some distressing and two coats of dark brown glaze, it really came together! Added new drawer pulls and this makeover is complete!


 If you have an old dresser that needs a new look this is a great option!  Let us know if we can help! Click here to contact us


Friday, July 3, 2015

Rustic Bench

Happy July 3rd!

It has been a great week! Thought I would finish up painting our latest bench this morning before we enjoy our holiday weekend. See pics below!


Here's what we started with: a full size headboard and footboard.


Hank cut the footboard in half. These will be the arm rests/sides of the bench.


He then used the original side rail for the front base... We also added tapered feet mouldings to the bottom to give it extra height.


Added 3/4 inch sanded plywood for the seat. Also added moulding around the edges to give it a clean look.


Here I am painting the base color. Unfortunately I forgot to take pics of the rest of the steps! (blog fail!) After getting the base color on, I dry brushed white paint over the top, distressed with sandpaper, then glazed.


Really happy with the way it turned out! This was a new technique for me, so it was a little scary! This beauty is now for sale! Contact us for more information. 

 Hope everyone has a Happy 4th of July! 


Tuesday, June 30, 2015

Antique Buffet Makeover

This morning, I finally finished this amazing buffet... See pics below for it's transformation!


All sanded down with drawers and doors removed...


3 coats of paint later...


I decided to stain the top of the buffet 1) to preserve some of that beautiful wood and 2) to make it slightly different than the matching hutch.

Before glazing...


The finished product! It turned out even more amazing than I imagined! You can't find this at a department store, folks! 


Nice view of the top.


Drawers are lined with the same pattern I used on the hutch to tie them together.


Inside of cabinets are painted as well!


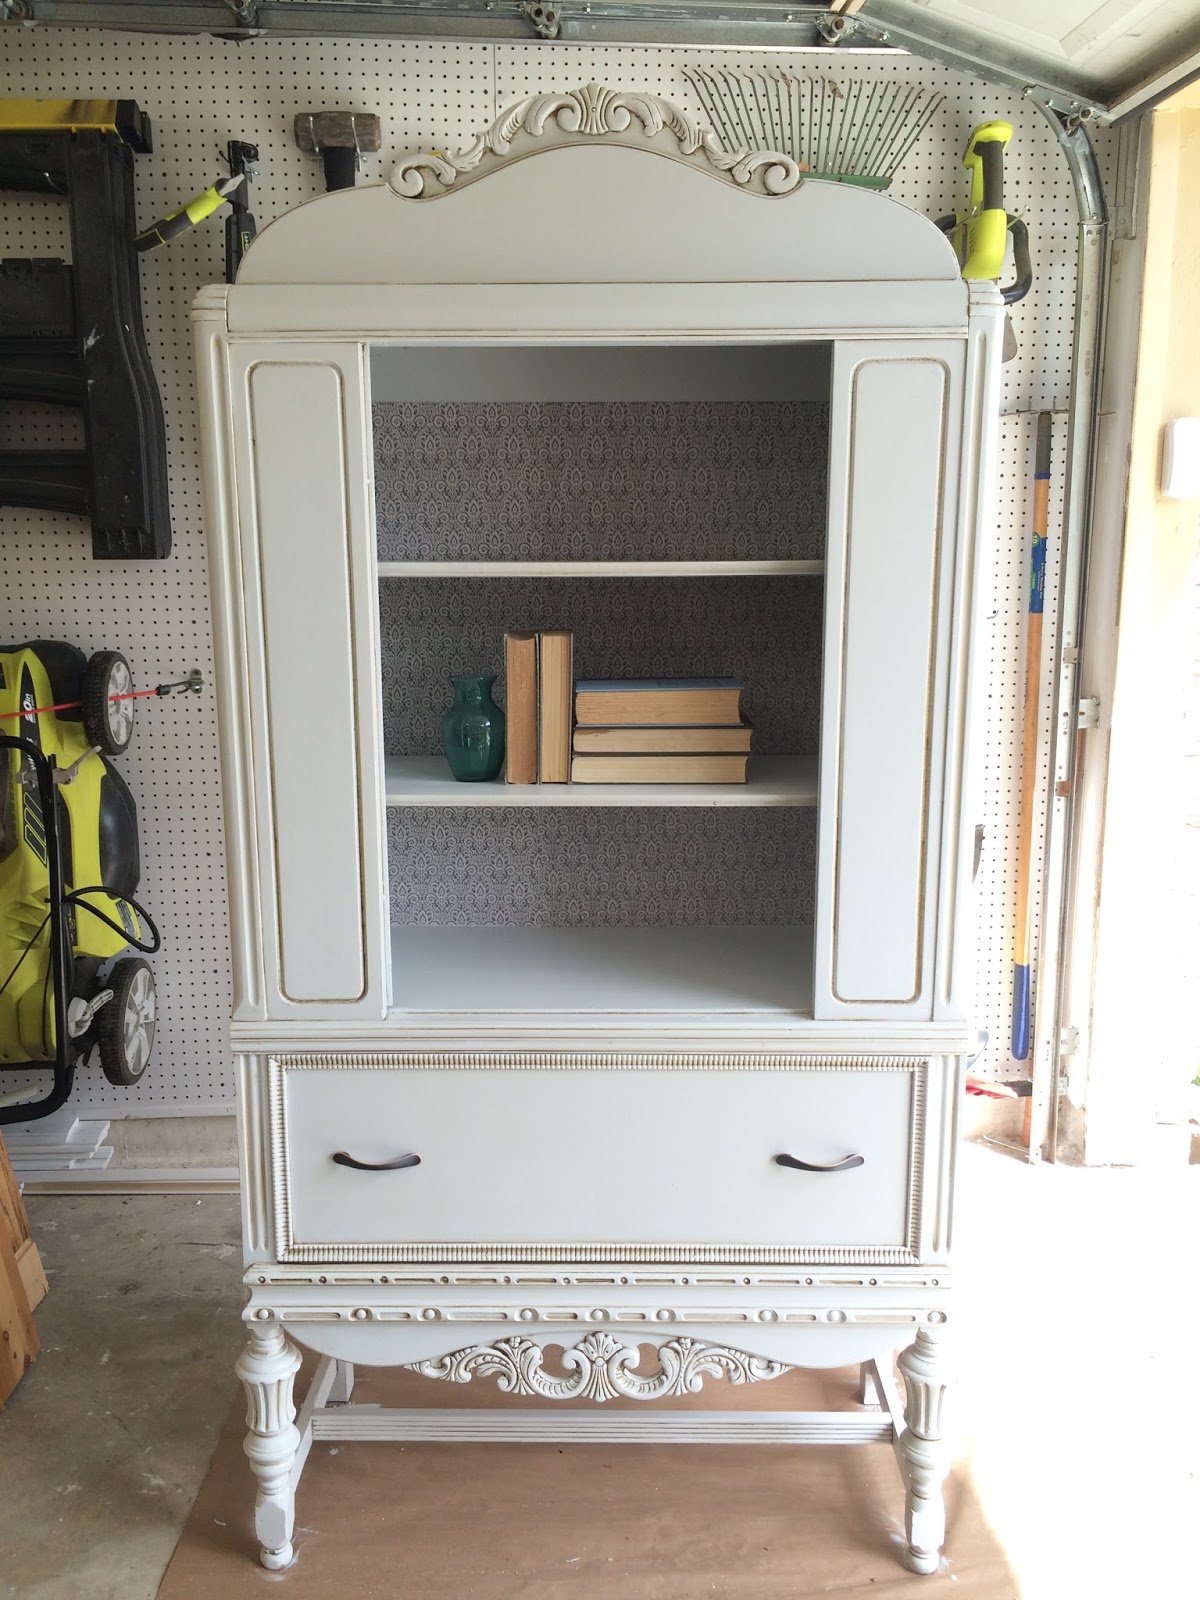
Here they are together, at last:) Will be for sale soon! Contact us for more information.


Saturday, June 27, 2015

Pickin' and Grinnin'

Happy Saturday Folks!

This morning, we went out trying to find some items that were just waiting for the "Perks Werks" treatment... One way we find our inventory is through old-fashioned garage sale-ing! Today was a great day! Check out our "picks" below:


This was our first find, an old wooden art desk with a matching bench. I absolutely love these art desks, there's so much you can do with them!


Look at this beauty... This was a rare find. Normally don't find this quality at garage sales, but the people were into refinishing furniture and took on too many projects... We don't believe in too many projects so now it's ours:)


Finally, we found this gem for our Angry Bird-obsessed 5 year old. The smile on his face was priceless!

Check back for more updates, and to see some amazing before and afters:) Hope everyone has a great weekend!


Saturday, June 20, 2015

All in a days work. Or two.

Hey everyone! Wanted to give a little update on the work we've been doing the past few days... I've been putting blood, sweat, and tears (literally) into this antique hutch. I really want to do this one right since it is real cherrywood. There is a part of me that feels guilty painting this, but ultimately decided this is the way to go. See pictures below for the progress...


Here I am sanding the detailed pieces by hand. Kinda tedious if you ask me!


Getting into the knooks and crannies...

Here it is after sanding. I hit the flat surfaces with an orbital sander. I was covered in dust at the end!


Here she is with 3 coats of paint. Completely different look!

After the paint dried, I started the glazing process. Can't get enough of glaze! Makes the details pop!


More glaze greatness...


Next, I am using this magic Mod Podge to attach wallpaper inside the hutch. It's a great way to add contrast to your pieces!


The process is somewhat simple: brush the Mod Podge on, place the wallpaper (almost any kind of paper will work) and smooth it out. Then brush more Mod Podge on top and ta-da!


Added liner to the drawer as well!


Isn't she lovely? We will be taking on the matching buffet next! Can't wait to see them together!