Tuesday, August 25, 2015

Buffet Makeover


A few weeks ago, we came across this adorable buffet that needed some TLC. It had some missing veneer, but other than that, great condition! Check out it's transformation below!


After spending several hours with a blow dryer and paint scraper, I removed most of the veneer from the top. The orbital sander took care of the rest. 


After everything was sanded down, I stained the top with Mission Oak stain, MinWax brand.


Here it is after 3 coats of stain. So pretty! Definitely one of my favorite stains ever...


In progress: 1 coat of antique white. Yikes!


3 coats later... Almost there! 


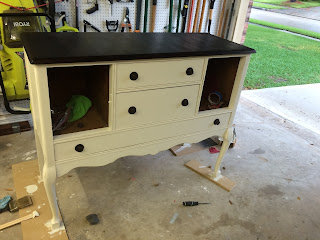
After adding the cabinet doors and drawers, doing some light distressing, and attaching the backboard, this beauty is ready for a new home!


Nice view of the top...


Close up of the distressed edges... Gives it some extra character!


Amazing what a little paint, stain, and hard work can do! If you want more information on this piece, contact us here

Sunday, August 16, 2015

Commissioned Table and Chairs Makeover

Last week, one of our customers reached out and asked me if I could make this table:


Look like this table:


She also had a set of 4 chairs that needed to be painted to coordinate with the new look. I took on the challenge, and I learned some new techniques that I can't wait to use in the future! See this table and chair set's transformation below...


After giving everything a good sanding, I started applying paint to everything that was going to be white. The color is Behr Premium Plus Ultra - Nano White, Sem-Gloss. It took multiple coats to get a nice clean look (especially on the chairs).


After the white was finished, I moved on to the table top. I applied 3 coats of Behr Premium Plus Ultra - Asphalt Gray for the base color.


Here is the extension piece that goes with table...


I decided to try a new technique for enhancing the beautiful details. I started with this clear furniture wax...


I scooped out the amount I thought I would need...


Then I added a small amount of the gray paint to it and mixed well with a plastic fork. 


I put about a teaspoon of the wax into a cheesecloth (or a very thin rag will work) and rubbed the wax into the details in a circular motion.


This is what it should look like. Let it sit for a about 5 minutes.


After a few minutes, use a clean rag to wipe away the excess wax.


Ta-da! It should leave you with a nice clean look!


I also decided to wax the table base and chairs to tie it all together.


Don't forget about the table leaf!


Next, I dry brushed the white paint over the gray to achieve the look that the client wanted. Just put a small amount of paint on your brush and wipe off any excess to achieve this effect.


Here is what it looked like when I was done. I thought it needed to be toned down, so I dry brushed the gray paint over the white.


The right side has the gray brushed over the white. Much better!


Here are the finished table tops! I then applied 5 coats of polyacrylic to give the table top as much protection as possible since it will be heavily used.


Here is the finished product! It is absolutely gorgeous and I think it is pretty close to the picture the client sent me! I am very proud of this project, and came up with a new wax technique in the process!



Wednesday, August 12, 2015

Custom Kitchen Island

Several weeks ago, we posted one of our most popular makeovers to date, a rolling kitchen island with and extendable top (see it here). We received a request from one of our customers to be on the lookout for another one. We found this microwave stand and immediately thought it would make a great rolling island for our customer... See it's transformation below!


Here is the microwave stand in it's original form... Interesting choice in knobs!


Hank completely disassembled it, sanded down each piece, and put it back together stronger than it was before! He removed the top because it was laminate, and our customer wanted a dark stained top. Real wood is the best way to go if you want stain. Here he is attaching custom made support for the extendable top.


Here's the island with it's brand new top! There are 3 hinges on the back to hold up the extension piece. The support folds out to extend the top, or folds in to release it. Hank added rolling feet to the legs. He decided to trim down the legs so that the height would remain the same with the rolling feet added to the bottom.


We stained the top on both sides with Minwax Polyshades Stain and Polyurethane - Mission Oak, Satin finish (3 coats).


Here is the finished product! It took 3 coats of black paint, and 3 coats of polyacrylic to seal it. 

View of the back.


Inside is painted and sealed as well!

View of the drawer and the gorgeous stain on top.

Our client was very happy with the end result. I'm a little jealous because I wanted to keep it;) That happens a lot! Now we're on to the next project: a commissioned table and chairs makeover:) Stay tuned!


Friday, August 7, 2015

Refinishing Kitchen Cabinets

Hey everyone! It's been a minute since I've blogged, but the good news is it's because we have been very busy! Today, Hank and I just finished up refinishing kitchen cabinets for one of our customers here in Friendswood. Her original finish was a very light sand color, and she wanted to go with a darker tone that would coordinate better with her floors and living area. See pictures below for the transformation!


The first step is to remove all of the cabinet doors/drawers, and either empty your cabinets or you can block them off with trash bags and tape.


Here are all of the cabinet doors and drawers sitting pretty in our garage.


We removed all of the hardware from the doors and drawers. It is so important to stay organized during this process. In the past, I've gone so far as to separate out the hardware for each door/drawer.


Our customer chose Oak Creek, Behr Brand - Home Collections for their cabinets.


 We went with the Behr Premium Ultra Paint and Primer, Interior Semi-Gloss.


Now this is the fun part. Sanding. It is so important to sand off the original finish, otherwise the paint will not stick and you will have paint peeling off in no time! When done, wipe down each door with a damp rag and dry completely before applying paint.


Here is the base of the cabinets with 3 coats of paint and 3 coats of polyacrylic to give it plenty of protection from wear and tear. As you can see, I taped off the edges (floors, walls, etc) with painter's tape to keep the lines as clean as possible.


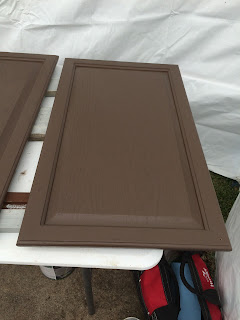
Due to limited space in the garage, we set up a pavilion in the back yard and started painting the doors.


My son even got in on the action!


Here is a close up of one of the doors. Each side required 3 coats of paint and 3 coats of polyacrylic.


Be sure to let the last coat of polyacrylic dry overnight so that the finish does not get damaged during transport!


Here is the kitchen after we brought all of the doors back in to re-install...


After hanging the doors, installing the knobs and drawer pulls... Here is the finished product! Our customer was extremely happy with the end result, which makes us extremely happy!

 Refinishing cabinets takes a lot of hard work, patience, and perseverance. The end result is worth it!