Sunday, October 4, 2015

Dresser to Half Bench Conversion


This is a the 2nd dresser makeover that we talked about in our previous blog post.  This is such a fun way to re-purpose an old dresser! This one has a bench on one side, drawers for storage on the other, and shoe storage on the bottom! This one is going in a kid's bedroom. He plans to sit on it while he plays video games;) Check out how we transformed this dresser below...


Here is the original dresser minus the drawers....


Hank had to completely take it apart because it was not stable. He was able to use a lot more of the original dresser than the first bench! 


Here he is adding wood for support. It's important that this is as sturdy as possible since this will get a lot of use!


Here's Hank framing out the drawers.


Adding more wood for support.


Next, he cut the top of the dresser into 2 pieces: one for the seat and for the top of the drawers. 


Coming together!


Now that the base is built, time to add wanes coating! 


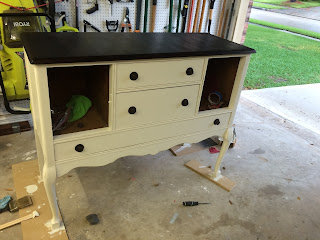
We decided to add more wanes coating on the bottom of the shoe cubbies. Really cute look!


Here it is after the 3rd coat of paint. I LOVE it as is, but our customer has a more rustic style, so it's time to antique it! 


TA-DA! After distressing with sandpaper and applying glaze, here is the finished product! Contact us on Facebook at facebook.com/perkswerks for your re-purposed piece today!

Happy Sunday!

The Perks: Hank and Amanda Perkins

Thursday, October 1, 2015

Dresser to Full Bench Conversion


Hey everyone! You've probably seen these awesome dresser to bench conversions floating around on Facebook and Pinterest... We recently received an order from one of our customers to make 2 benches from 2 of her old dressers. This blog post is about bench #1: a full seat version with drawers on the bottom for storage. Will be posting about bench #2 soon, so stay tuned! Check out it's transformation below! 


Here is the original dresser. Not in great condition and very wobbly, but has potential!


Hank decided to scrap most of the dresser due to it's condition and the fact that most of it was particle board, but we did keep the top to re-use as the seat, and 2 drawers. Here he is building the bones of the bench.


Here it is with the sides and the bottom support attached.


Here's Hank adding the framework for the drawers.


The original top of the dresser is now the seat!


The framework for the drawers is complete.

The drawers are in place now that the framework has been completed.

View of the back.


Now that the body of the bench is constructed, it's time to add the wanes coating!


The wanes coating adds so much character to the bench!


Now that the wanes coating is attached, we can add moulding to give it a finished look.


 Of course, having the right tools is the key!


Even the drawers got wanes coating and moulding!


Don't forget to add the backboard!


Here it is ready for sanding and paint! We also added a baseboard to give it a finished look.


 Here I am with one of my favorite tools, my orbital sander. I only had to sand the paint off of the seat, since everything else was bare bones and never painted.


Hank got into a rare mood to paint, so I took advantage;)


Go Hank go!


Here is the base coat - ready for glaze!


View of the drawers.


You can really see the magic that happens with glaze in this pic.


All it needs now is a couple of coats of poly-acrylic to protect the paint and drawer pulls and it's ready to go!


Here's Hank installing the drawer pulls.


And here is the finished product! Can't wait to see pics of it in it's new home... A one of a kind piece of furniture brought to you by Perks Werks! Contact us on our Facebook page for yours at Facebook.com/perkswerks 

Have a great day!

Hank and Amanda Perkins

Tuesday, August 25, 2015

Buffet Makeover


A few weeks ago, we came across this adorable buffet that needed some TLC. It had some missing veneer, but other than that, great condition! Check out it's transformation below!


After spending several hours with a blow dryer and paint scraper, I removed most of the veneer from the top. The orbital sander took care of the rest. 


After everything was sanded down, I stained the top with Mission Oak stain, MinWax brand.


Here it is after 3 coats of stain. So pretty! Definitely one of my favorite stains ever...


In progress: 1 coat of antique white. Yikes!


3 coats later... Almost there! 


After adding the cabinet doors and drawers, doing some light distressing, and attaching the backboard, this beauty is ready for a new home!


Nice view of the top...


Close up of the distressed edges... Gives it some extra character!


Amazing what a little paint, stain, and hard work can do! If you want more information on this piece, contact us here

Sunday, August 16, 2015

Commissioned Table and Chairs Makeover

Last week, one of our customers reached out and asked me if I could make this table:


Look like this table:


She also had a set of 4 chairs that needed to be painted to coordinate with the new look. I took on the challenge, and I learned some new techniques that I can't wait to use in the future! See this table and chair set's transformation below...


After giving everything a good sanding, I started applying paint to everything that was going to be white. The color is Behr Premium Plus Ultra - Nano White, Sem-Gloss. It took multiple coats to get a nice clean look (especially on the chairs).


After the white was finished, I moved on to the table top. I applied 3 coats of Behr Premium Plus Ultra - Asphalt Gray for the base color.


Here is the extension piece that goes with table...


I decided to try a new technique for enhancing the beautiful details. I started with this clear furniture wax...


I scooped out the amount I thought I would need...


Then I added a small amount of the gray paint to it and mixed well with a plastic fork. 


I put about a teaspoon of the wax into a cheesecloth (or a very thin rag will work) and rubbed the wax into the details in a circular motion.


This is what it should look like. Let it sit for a about 5 minutes.


After a few minutes, use a clean rag to wipe away the excess wax.


Ta-da! It should leave you with a nice clean look!


I also decided to wax the table base and chairs to tie it all together.


Don't forget about the table leaf!


Next, I dry brushed the white paint over the gray to achieve the look that the client wanted. Just put a small amount of paint on your brush and wipe off any excess to achieve this effect.


Here is what it looked like when I was done. I thought it needed to be toned down, so I dry brushed the gray paint over the white.


The right side has the gray brushed over the white. Much better!


Here are the finished table tops! I then applied 5 coats of polyacrylic to give the table top as much protection as possible since it will be heavily used.


Here is the finished product! It is absolutely gorgeous and I think it is pretty close to the picture the client sent me! I am very proud of this project, and came up with a new wax technique in the process!